


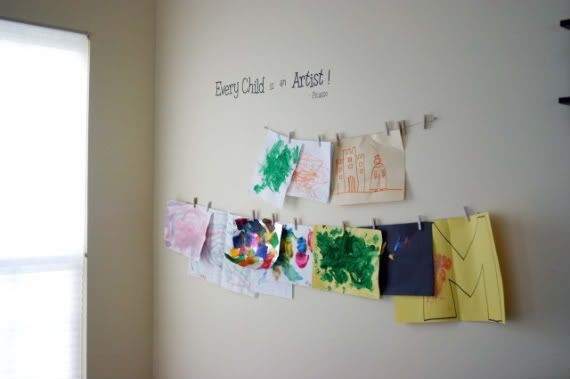
I got the idea for the art display above from The Creative Crate. Very inspiring creative projects over there. Go check it out if you have some time. I originally wanted to cut out the quote using my Cricut machine, like Erin did, but found that to be difficult. I didn't like the font cartridges I had and the vinyl for the machine is expensive. So I searched and searched the Internet and ended up buying the vinyl quote from one of the stores on etsy. I then took fish eye hooks and placed them in the wall and strung picture hanger wire between them. I used small clothespins that I found at A.C. Moore and painted them white. However during that process I decided that spray painting them would have been way easier. Noting that I purchased white spray paint for future use.
I love this idea because now that Mason is in Preschool, he brings home artwork every Friday in his backpack. Since our stupid stainless steel refrigerator is non-magnetic. Who knew stainless steel wold not be magnetic? I don't have a place to display all this wonderful art. Now I do. The best part is that Mason feels so proud to have it all displayed in a special place, in our family room with all the other toys and kids stuff. Each Friday we rush home to open his backpack and see what new art we can display. Already it's been filled up and I am running out of room; twice the capacity you see in the photo and think I need to make yet another row. Mostly though, I really enjoy sitting at the table or on the couch, looking up and seeing all my son's creativity staring back at me.
Speaking of Preschool. In the previous post I mentioned how incredibly busy I am with all the room parents duties, fundraisers, permission slips, parent connection committee, etc. I sort of anticipated this year being a bit crazy, so I figured I needed some sort of organized area for all the school stuff. Enter the SIC.
 This is what Fred dubbed it anyway. I call it the School Information Center. It's a small section of countertop in our kitchen that I cleared away for all the important school stuff that comes home. Important dates go on the calendar, such as school closings, field trips, etc. Important notes, such as bring in $2 for grocery store trip and make sure orange shirt is cleaned for picture day, go on the chalkboard. Important papers to be signed or filed, go in the metal file basket (the most important on top with sticky notes). Anything else, like invites to the PCC social or ornament exchange get tacked to the board. It really helps keep things in perspective to be all in one place and in plain view where I spend most of my day.
 To make this center I repurposed an old cork board I had down in my craft room. I painted it white, then covered the cork with coordinating scrapbook paper, using Mod Podge, to make it look pretty instead of boring. I then put a layer of Mod Podge over the paper to help with wear and tear. The chalkboard is a vinyl piece I picked up at A.C. Moore but you could do the same with chalkboard paint, and make it any size and shape you want.
For the calendar, which is like a dry erase board, I used a cheap picture frame I picked up at A.C. Moore. I spray painted it black then used the glass as my base. On the inside I used a permanent marker (which wipes off with some alcohol), to make the grid. I then used rub-ons I had in my stash for the word, MONTH, and stickers for the days of the week. Voila! A dry erase homemade calendar, way cheaper and a little more elegant than the ones you get at the store. Once again I got this idea for the calendar over at The Creative Crate.
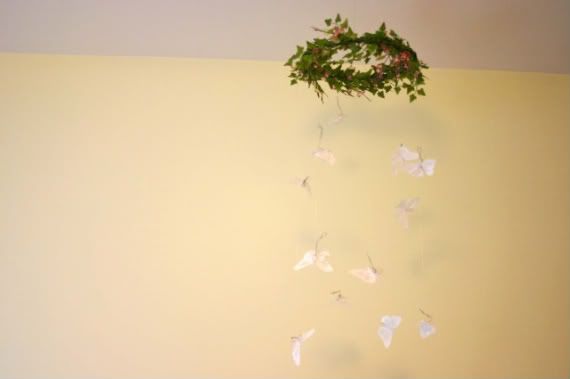
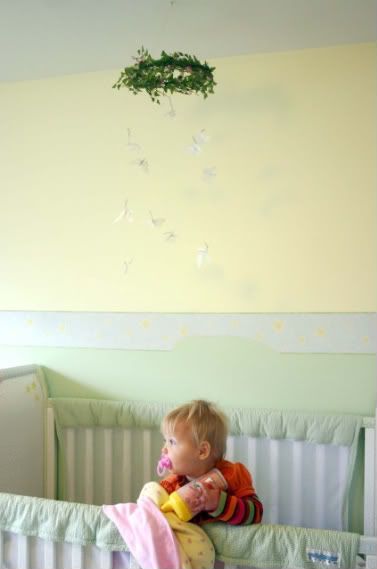
I can't remember exactly when I got the idea that I wanted to make a mobile for Sophie, possibly when she broke the hand-me-down airplane mobile that played twinkle, twinkle; the one I so very much adored when Mason was a baby. However, sometime in March I searched for ideas on how to make it and gathered supplies. I know this because the photos I took of the butterfly mobile I saw at Pottery Barn on my camera says it was March. I used that as inspiration, and while Sophie was still a lump laying on the floor, I spread out my supplies, turned on reruns of Cold Case, and assembled my creation. And then it sat in Sophie's room for 7 months until I decided to finally hang it up a few weeks ago. I found some butterflies with alligator clips at Michaels, and the green wreath with pink crystals was on sale. I then used clear jewelry wire to hand the butterflies from the wreath. It turned out rather nice.

I have a few more projects that I've done, dealing with chalkboard paint. A post on those is in the works so stay tuned for that.
In the meantime I am reveling in the time I have with our family and this holiday of gratitude. Mason is out of school this whole week (ugh!) so I am stocking up on numerous crafts for us to do relating to the season. Keeping a preschooler and a toddler occupied for 24 hours is quite a feet and I imagine that the t.v. will play a big roll this week, as well as some Wii, and a few movie nights might make an appearance.


No comments:
Post a Comment